We think either the grapes or the peaches were too acidic, because we were having trouble keeping the pH of the new vat basic. This caused our results to be awful... le sigh. So, as it stands now, your options are apples, pears, or bananas and don't you dare go near anything that even thinks about having citrus of any sort.
In better news-- 3rd weaving lesson in Chinchero tomorrow!! Sounds like I'll be doing Chakimas (wide belts) this time. It's so exciting!
Friday, September 23, 2011


Indigo: A different plan of attack for the same recipe
So it didn't work out as well as we would've liked the other day... We got light teals and greys. So we re-worked what we're doing.

Here's the new recipe:
Natural Indigo Fructose Dye
Needed: 1kg rotten/over-ripe fruit
3gal bucket with a snug lid
10g natural reduced indigo
Mortar and pestle
6g Calx/ slaked lime
A stove and a tea kettle and a pot or two
Cutting board and knife
Gram scale
Nitrile gloves
Dust mask
Thermometer
Stir stick (pref. wood)
Protein Fibers (yarn, fabric, ect) in aprox. 15g quantities to begin…
Two notes before I begin:
-First, always put the lid on your bucket between steps, to reduce the amount of oxygen that is allowed access to the vat.
-Second, always pour your liquids gently, tipping the bucket and pouring down the side to prevent the addition of oxygen to the vat.
1. Crush or very finely chop the 1kg fruit. The riper the fruit the better. Add to pot with a very small amount of water (1/4c aprox) and boil no more than 20min.
2. Put on a tea kettle for boiling hot water.
3. Add entire pot to your 3gal bucket and add hot water until the bucket is just
slightly less than half full.
4. Weigh out your 10g indigo and grind it until it’s an even, extremely fine consistency. Make sure you’re wearing a dust mask as the particulates can act as inhalants and irritate your throat.
5. Add hot water to your indigo in the mortar and pestle and grind again until all the indigo has dissolved.
6. Add dissolved indigo to your fructose vat and stir with the pestle to get all the indigo off it.
7. Measure Calx (6g) and add immediately to your vat. **remember to wear gloves and measure it in a place with good air circulation
8. Stir the calx quickly into your vat. The liquid will turn a dark olive green. If no bubbles form, add another 4-6g Calx to the vat and stir quickly again. You are looking for surface bubbles and a bronze skin that forms on the surface.

9. Let sit 10 minutes before skimming the film and bubbles off the surface.
10. Wet your yarn and wring out completely before adding to the vat. Add it slowly, using your stir stick to gently press under the surface of the indigo liquid.
11. Leave yarn sit 20min.
12. Remove the yarn gently (no bubbles) after 20min and rinse well.
13. Shake the yarn to expose it to oxygen, until all green color has left it.

14. Hang to dry 30min

15. If the yarn is not dark enough, you can re-dip it after your 30min is up.
To do consecutive vats:
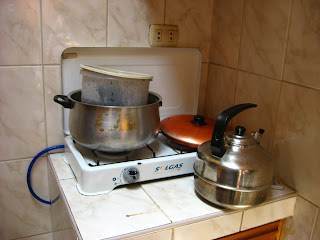
1. Heat the pot of water to boiling and add the vat to it once it’s hot. (like a double boiler)
2. Leave vat in pot until the temperature reaches 50 degrees C/F??
3. Add more yarn, same as above. Leave sit 30 min before removing and rinsing. Shake as before to expose to oxygen, and hang dry.
**After you are finished dyeing, you must leave your fabric/yarn alone for 2 weeks before using!!

Here's the new recipe:
Natural Indigo Fructose Dye
Needed: 1kg rotten/over-ripe fruit
3gal bucket with a snug lid
10g natural reduced indigo
Mortar and pestle
6g Calx/ slaked lime
A stove and a tea kettle and a pot or two
Cutting board and knife
Gram scale
Nitrile gloves
Dust mask
Thermometer
Stir stick (pref. wood)
Protein Fibers (yarn, fabric, ect) in aprox. 15g quantities to begin…
Two notes before I begin:
-First, always put the lid on your bucket between steps, to reduce the amount of oxygen that is allowed access to the vat.
-Second, always pour your liquids gently, tipping the bucket and pouring down the side to prevent the addition of oxygen to the vat.
1. Crush or very finely chop the 1kg fruit. The riper the fruit the better. Add to pot with a very small amount of water (1/4c aprox) and boil no more than 20min.
2. Put on a tea kettle for boiling hot water.
3. Add entire pot to your 3gal bucket and add hot water until the bucket is just
slightly less than half full.
4. Weigh out your 10g indigo and grind it until it’s an even, extremely fine consistency. Make sure you’re wearing a dust mask as the particulates can act as inhalants and irritate your throat.
5. Add hot water to your indigo in the mortar and pestle and grind again until all the indigo has dissolved.
6. Add dissolved indigo to your fructose vat and stir with the pestle to get all the indigo off it.
7. Measure Calx (6g) and add immediately to your vat. **remember to wear gloves and measure it in a place with good air circulation
8. Stir the calx quickly into your vat. The liquid will turn a dark olive green. If no bubbles form, add another 4-6g Calx to the vat and stir quickly again. You are looking for surface bubbles and a bronze skin that forms on the surface.

9. Let sit 10 minutes before skimming the film and bubbles off the surface.
10. Wet your yarn and wring out completely before adding to the vat. Add it slowly, using your stir stick to gently press under the surface of the indigo liquid.
11. Leave yarn sit 20min.
12. Remove the yarn gently (no bubbles) after 20min and rinse well.
13. Shake the yarn to expose it to oxygen, until all green color has left it.

14. Hang to dry 30min

15. If the yarn is not dark enough, you can re-dip it after your 30min is up.
To do consecutive vats:

1. Heat the pot of water to boiling and add the vat to it once it’s hot. (like a double boiler)
2. Leave vat in pot until the temperature reaches 50 degrees C/F??
3. Add more yarn, same as above. Leave sit 30 min before removing and rinsing. Shake as before to expose to oxygen, and hang dry.
**After you are finished dyeing, you must leave your fabric/yarn alone for 2 weeks before using!!
Wednesday, September 21, 2011
Indigo Day #2
Got to work today just in time for Indira to come back with a mortar and pestle. We finished making our skeins (we found some cotton, no worries) and took the Calx and indigo outside to weigh out (calx is an irritant, so outside is better). We are testing two different types of Indigo, so we measured out six 6g packets of calx, three 10g packets of a grey-blue looking indigo, and three 10g packets of a bright blue indigo. All the indigo we're using is natural, but pre-reduced, so it comes in brickett form and we have to grind it up (hence the need for the mortar and pestle).

Mix the indigo into the bucket, then the calx and wait for the bubbles!

The Calx (lime) turns it green. Once there are bubbles, you move them to the side and add the yarn and wait 24hrs.

On the way home there was a rainbow.


Mix the indigo into the bucket, then the calx and wait for the bubbles!

The Calx (lime) turns it green. Once there are bubbles, you move them to the side and add the yarn and wait 24hrs.

On the way home there was a rainbow.

Tuesday, September 20, 2011
A deviation from the Indigo Plans....
Indira called in sick today-- she said she ate something that didn't agree with her. So whatever was I to do?! I hadn't brought my computer (not that I wanted to be on it all day anyway), so I began balling up 30g balls of alpaca yarn for the dye testing.... I was interrupted the first time by the necessity for an umbrella swift for the skein to spin on. My trying to ask for an umbrella swift was apparently hilarious, as all the ladies in the office where the ball winders are laughed at me with I asked for their counter part. Paragua de la llana is not what it's called, as I found out. When one was uncovered, it was so sad and broken I had to tape it to it's pole and tie it down so it didn't shrink on me. I'm thinking of asking one of the manufacturers to donate a few for the Center.
I was interrupted the second time when Nilda asked if I was doing anything important today and then sent me and one of the weavers out to Chinchero to take pictures of hands doing pick-up weaving for the cover of the book she's working on. She wanted young and old and everything in the middle hands, with a variety of weaving sizes. So off we went. A taxi from the center to the collectivo depot to Chinchero... It not only rained the whole way there but when we got there, there was more hail on the ground. Very few weavers out and about for the picture taking. Le sigh. I think I did alright though, and all the weavers were excited to see the pictures of their hands. Had lunch in Chinchero-- some kind of thick beef broth soup with barley and veggies, and lomo saltado (salty beef with potatos and rice). Was then packed back into a collectivo to get to Cusco, then a taxi back to the center. Got back just in time to photograph some weavings for their texture, and to help with creating an English version of the index page for Nilda's book. Somewhere in there I did manage to make 6 balls of 30g each of alpaca yarn, however I was hoping to get to the sheep (obeca) yarn as well.
Left work later than usual, hit the grocery store on the way home (only to find that the only thing they had on my list was wine), came home and devoured some guacamole. I'm about to resume work on my weaving, and if I'm lucky, I'll have it finished before heading out for salsa dancing this evening.
I was interrupted the second time when Nilda asked if I was doing anything important today and then sent me and one of the weavers out to Chinchero to take pictures of hands doing pick-up weaving for the cover of the book she's working on. She wanted young and old and everything in the middle hands, with a variety of weaving sizes. So off we went. A taxi from the center to the collectivo depot to Chinchero... It not only rained the whole way there but when we got there, there was more hail on the ground. Very few weavers out and about for the picture taking. Le sigh. I think I did alright though, and all the weavers were excited to see the pictures of their hands. Had lunch in Chinchero-- some kind of thick beef broth soup with barley and veggies, and lomo saltado (salty beef with potatos and rice). Was then packed back into a collectivo to get to Cusco, then a taxi back to the center. Got back just in time to photograph some weavings for their texture, and to help with creating an English version of the index page for Nilda's book. Somewhere in there I did manage to make 6 balls of 30g each of alpaca yarn, however I was hoping to get to the sheep (obeca) yarn as well.
Left work later than usual, hit the grocery store on the way home (only to find that the only thing they had on my list was wine), came home and devoured some guacamole. I'm about to resume work on my weaving, and if I'm lucky, I'll have it finished before heading out for salsa dancing this evening.
Compare and Contrast
Things that don't seem to exist in Cusco:
muffin Cups
cotton yarn
70% dark chocolate (or any kind of dark chocolate with sugar)
cocoa powder
coconut milk
Jalapenos
people who exercise on purpose (and not just in necessity)
whole wheat flour
corn tortillas
hot water for baths
predictable weather
blueberries
You may ask "why is most everything on this list food related?" I would answer, "because I love to cook and I really love to eat." Then you may ask "what prompted this list-making?" And I'd answer, "Finding a muffin tin after a month and a half of living her and not finding muffin cups to go with it."
muffin Cups
cotton yarn
70% dark chocolate (or any kind of dark chocolate with sugar)
cocoa powder
coconut milk
Jalapenos
people who exercise on purpose (and not just in necessity)
whole wheat flour
corn tortillas
hot water for baths
predictable weather
blueberries
You may ask "why is most everything on this list food related?" I would answer, "because I love to cook and I really love to eat." Then you may ask "what prompted this list-making?" And I'd answer, "Finding a muffin tin after a month and a half of living her and not finding muffin cups to go with it."
Monday, September 19, 2011
Fructos Indigo Vat-- Day #1
Today Indira and I began the first of our natural dye natural vat testing. We decided that, as we'd collected 3 versions of Fructose Vat Indigo Dye recipe, it was a good place to start.
----------------
The Recipe:
1kg over-ripe fruit
10g finely crushed indigo
food grade slaked lime or calx
water
pH strips
Strainer
Stove and small pot
Mortar and pestle
Gallon bucket
This is aprox what we will be doing: Crush the indigo finely, then hydrate it by crushing again with a small quantity of water in order to get a fluid paste. Boil your over-ripe fruit in water for 10-15 min, in order to extract both sugars and flavonoïds, then in this liquid add your indigo (strain as you do) + one full spoon of lime or calx and stir gently-- the coppery surface appears, then some blue bubbles, while the liquid turns yellow/green. At that step you may try a few samples, but if you wait for a couple of hours, the vat is stronger, even the day after.
The main difficulty is to keep this vat for a long time. Indeed it is really possible, but at this step, the control of the pH and some observations must be done before each dye.
This point takes time and some days for an efficient course. This kind of vats is very appropriate for dyeing protein fibers, but even cellulosic fibers can be dyed in it, it is a question of pH again. Remember that the reduction is issued of the oxidation of sugars. During this transformation, the sugar is transformed in lactic acid, so the pH goes down, so you will need to add some more lime from time to time to correct the pH."
----------------
We began by collecting the ingredients necessary... A trip to the street of fruit vendors in Santiago for over-ripe fruit (apples, strawberries, papaya, and pineapples for the first tests). They were all like "what?" but gave it to us anyway. Then off to a magical cooking store for a strainer and a cooking thermometer. Of course we forgot the mortar and pestle, so we have to go back tomorrow. While we were there I found a muffin tin and a thermos for tea (hellz yes muffins!)
On our wandering path we found lunch (roasted oca and plantain and sweet potato, and also bruschetta and chocolate filled croissants and mini avocados) which we took back to the Center with us and feasted upon. We also found a miscellaneous paper items shop that specialized in platen printed receipts and wedding cards. THERE WERE TWO PLATEN PRESSES RUNNING IN THE BACK OF THIS SHOP!!! I was more than excited. They were in beautiful condition and it looked like there might even be a few type cases back there.... Found a store that has every type of paper I've encountered and then some (I'm totally going back there, screw the art stores that only carry cheap watercolor paper).
After lunch, we began the cooking of the fruit in the little kitchen in the back of the center. We donned gloves and boiled water and weighed out our dead fruit. I was given the pleasant job of pulling the green tops off the dead&squishy strawberries before they went into the pot. Indira prepped the apples, and while we waited for these to cook, I got to scoop seeds from the really dead papaya and chop it roughly. Once a pot was done, it was poured through the strainer and the guts were pressed until they leeched no more moisture. At the end of the day, we have 3 buckets with fruit sugar juices in them. Tomorrow we'll be dividing these into 6 buckets as we're testing two types of indigo, adding the lime, and dividing and weighing out yarn while we wait for the buckets to grow stronger.
On my way home I stopped at the Mercado de Wanchaqu and bought veggies, however, I also found a person there who sells 100% Cotton yarn (string), so sounds like we're headed there tomorrow as well, because we've currently got alpaca and sheep but no cotton. It's really crazy how hard it is to get 100% cotton anything here, even just plain muslin broadcloth! My usual "I'll just order it from Webs" doesn't work here though so we have to get creative.
And now my apology: I'm sorry I have no pictures of icky dead fruit for you, I'll definitely try harder tomorrow....
----------------
The Recipe:
1kg over-ripe fruit
10g finely crushed indigo
food grade slaked lime or calx
water
pH strips
Strainer
Stove and small pot
Mortar and pestle
Gallon bucket
This is aprox what we will be doing: Crush the indigo finely, then hydrate it by crushing again with a small quantity of water in order to get a fluid paste. Boil your over-ripe fruit in water for 10-15 min, in order to extract both sugars and flavonoïds, then in this liquid add your indigo (strain as you do) + one full spoon of lime or calx and stir gently-- the coppery surface appears, then some blue bubbles, while the liquid turns yellow/green. At that step you may try a few samples, but if you wait for a couple of hours, the vat is stronger, even the day after.
The main difficulty is to keep this vat for a long time. Indeed it is really possible, but at this step, the control of the pH and some observations must be done before each dye.
This point takes time and some days for an efficient course. This kind of vats is very appropriate for dyeing protein fibers, but even cellulosic fibers can be dyed in it, it is a question of pH again. Remember that the reduction is issued of the oxidation of sugars. During this transformation, the sugar is transformed in lactic acid, so the pH goes down, so you will need to add some more lime from time to time to correct the pH."
----------------
We began by collecting the ingredients necessary... A trip to the street of fruit vendors in Santiago for over-ripe fruit (apples, strawberries, papaya, and pineapples for the first tests). They were all like "what?" but gave it to us anyway. Then off to a magical cooking store for a strainer and a cooking thermometer. Of course we forgot the mortar and pestle, so we have to go back tomorrow. While we were there I found a muffin tin and a thermos for tea (hellz yes muffins!)
On our wandering path we found lunch (roasted oca and plantain and sweet potato, and also bruschetta and chocolate filled croissants and mini avocados) which we took back to the Center with us and feasted upon. We also found a miscellaneous paper items shop that specialized in platen printed receipts and wedding cards. THERE WERE TWO PLATEN PRESSES RUNNING IN THE BACK OF THIS SHOP!!! I was more than excited. They were in beautiful condition and it looked like there might even be a few type cases back there.... Found a store that has every type of paper I've encountered and then some (I'm totally going back there, screw the art stores that only carry cheap watercolor paper).
After lunch, we began the cooking of the fruit in the little kitchen in the back of the center. We donned gloves and boiled water and weighed out our dead fruit. I was given the pleasant job of pulling the green tops off the dead&squishy strawberries before they went into the pot. Indira prepped the apples, and while we waited for these to cook, I got to scoop seeds from the really dead papaya and chop it roughly. Once a pot was done, it was poured through the strainer and the guts were pressed until they leeched no more moisture. At the end of the day, we have 3 buckets with fruit sugar juices in them. Tomorrow we'll be dividing these into 6 buckets as we're testing two types of indigo, adding the lime, and dividing and weighing out yarn while we wait for the buckets to grow stronger.
On my way home I stopped at the Mercado de Wanchaqu and bought veggies, however, I also found a person there who sells 100% Cotton yarn (string), so sounds like we're headed there tomorrow as well, because we've currently got alpaca and sheep but no cotton. It's really crazy how hard it is to get 100% cotton anything here, even just plain muslin broadcloth! My usual "I'll just order it from Webs" doesn't work here though so we have to get creative.
And now my apology: I'm sorry I have no pictures of icky dead fruit for you, I'll definitely try harder tomorrow....
Sunday, September 18, 2011
Weaving in Chinchero
So, after a whole month of waiting and working on my spinning, I got to go out to Chinchero Saturday and today to begin learning to weave. When you're learning, you begin with Jakimas-- narrow belt weavings.

On Saturday, I finished weaving two pre-made warps. The first was a plain weave, just to get used to the type of weaving, and get a feel for the tension and keeping a good edge. The second was the pattern Tanka Ch'uro, which seems to be a flower derived pattern. It is a simple pattern, used for getting used to reading pick-up patterns.
The Tanka Ch'uro pattern:
xxooxx
ooxxoo
oooooo
xxooxx
oooooo
ooxxoo
xxooxx
oooooo
ooxxoo
oooooo
Which looks like this:

Today I learned to make the warps, and then advanced to a more complex pattern called the Cuty. I'm told it's the basis for a great deal of the rest of the patterning.

The Cuty pattern:
oxxooxxo
oooooooo
xoooooox
xxooooxx
oxxooxxo
xxxxooxx
xooxxoox
ooooxxoo
xooxxoox
ooxxoooo
xooxxoox
xxooxxxx
oxxooxxo
xxooooxx
xoooooox
oooooooo
Which looks something like this:
oooooooo
oxxxxxxo
xxxoooxx
oxxooxxo
ooxxoooo
oooxxxoo
ooooxxxx
oxxoooxx
xxoooxxx
oxxxxxxo
oooooooo
I am planning to work on my Cuty Jakima during the evenings this week, possibly while watching Star Wars, possibly while I listen to my back-log of Savage Love podcasts. I'll show it off fully once it's finished.

On Saturday, I finished weaving two pre-made warps. The first was a plain weave, just to get used to the type of weaving, and get a feel for the tension and keeping a good edge. The second was the pattern Tanka Ch'uro, which seems to be a flower derived pattern. It is a simple pattern, used for getting used to reading pick-up patterns.
The Tanka Ch'uro pattern:
xxooxx
ooxxoo
oooooo
xxooxx
oooooo
ooxxoo
xxooxx
oooooo
ooxxoo
oooooo
Which looks like this:

Today I learned to make the warps, and then advanced to a more complex pattern called the Cuty. I'm told it's the basis for a great deal of the rest of the patterning.

The Cuty pattern:
oxxooxxo
oooooooo
xoooooox
xxooooxx
oxxooxxo
xxxxooxx
xooxxoox
ooooxxoo
xooxxoox
ooxxoooo
xooxxoox
xxooxxxx
oxxooxxo
xxooooxx
xoooooox
oooooooo
Which looks something like this:
oooooooo
oxxxxxxo
xxxoooxx
oxxooxxo
ooxxoooo
oooxxxoo
ooooxxxx
oxxoooxx
xxoooxxx
oxxxxxxo
oooooooo
I am planning to work on my Cuty Jakima during the evenings this week, possibly while watching Star Wars, possibly while I listen to my back-log of Savage Love podcasts. I'll show it off fully once it's finished.
Subscribe to:
Posts (Atom)
